User Interface Overview
Run:ai provides a single user interface that, depending on your role, serves both as a control-plane management tool and a researcher workbench.
The control-plane part of the tool allows the administrator to:
- Analyze cluster status using dashboards.
- Manage Run:ai metadata such as users, departments, and projects.
- View Job details to be able to help researchers solve Job-related issues.
The researcher workbench part of the tool allows Researchers to submit, delete and pause Jobs, view Job logs etc.
Setup
The cluster installation process requires configuring a new cluster. On SaaS-based installations, the cluster creation wizard requires a URL to the cluster as explained here.
Architecture
- Run:ai saves metadata such as users, projects, departments, clusters, and tenant settings, in the control plane residing on the Run:ai cloud.
- Workload information resides on (sometimes multiple) GPU clusters.
- The Run:ai user interface needs to work with both sources of information.
As such, the chosen architecture of the user interface is:
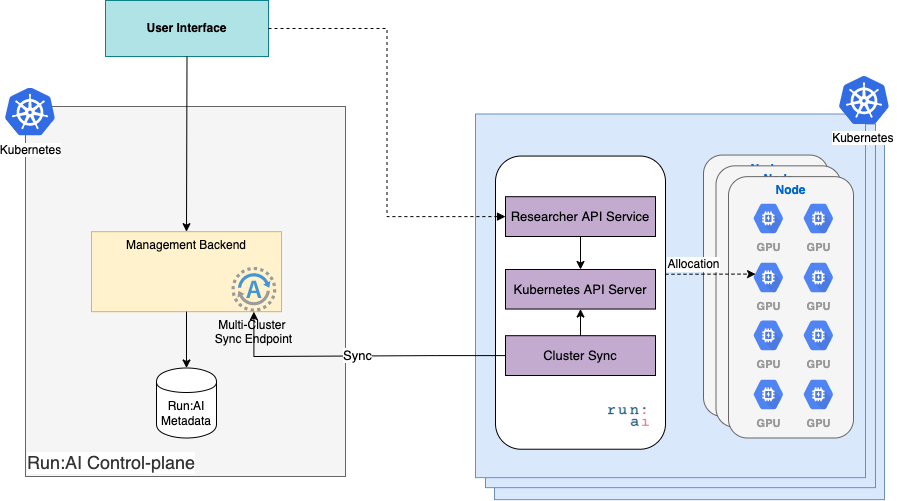
- The user interface is served from the management backend.
- The user interface connects directly to multiple GPU clusters using cross-origin access. This works using CORS: Cross-origin resource sharing. This allows submitting workloads and getting extended logging information directly from the GPU clusters.
- Meta-data, such as Projects, Settings, and Job information is synced into the management backend via a cluster-sync service. Cluster-sync creates an outbound-only channel with no incoming HTTPS connections.
Important
One corollary of this architecture is that for SaaS-based tenants, the user interface will only be able to access the cluster when the browser is inside the corporate firewall. When working outside the firewall. Workload-related functionality such as Submitting a Job, viewing Job lots etc, is disabled.
Administrator Messages
System administrators can use Administrator messages to make announcements to users once they have logged in. These messages typically are used to keep user informed about different aspects of the platform.
To configure an Administrator message:
- Press
Settings | General. - Expand the Message from administrator pane.
- Press Message.
- Enter your message in the text box. Use the formatting tools in the toolbar to add special formatting or links to the message.
- Enable the
Display "Don't show this again" checkbox on message to usersto allow the users to see the message only once. - Press Publish when complete.